
Robotics
OBSTACLE AVOIDING CAR.
A 4WD robot that senses what's ahead with an ultrasonic sensor and steers around it, scanning left and right with a servo to pick the clearer path.
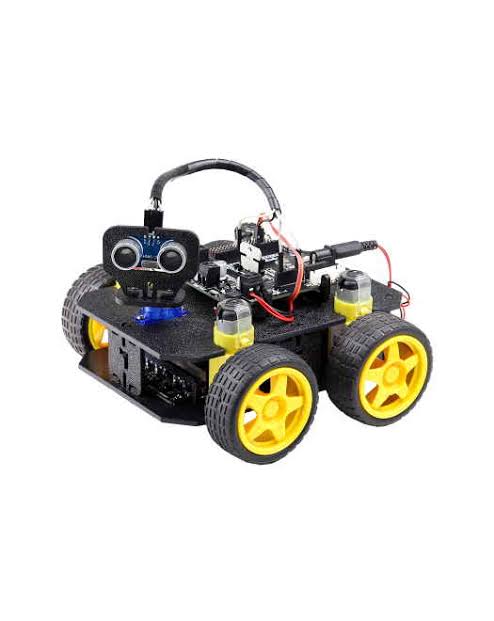
How it works
An ultrasonic sensor mounted at the front sends out a short pulse and times how long it takes to bounce back off whatever is ahead, which the Arduino converts into a distance in centimeters. While the path is clear, the car drives forward. When something gets closer than a set threshold, it stops, sweeps the sensor left and right on a servo to check which side has more open space, then turns toward the clearer side and continues.
Components used
Identified from the build shown above. Exact part models may vary by supplier.
Arduino Uno (or compatible board)
Runs the control logic: reads the sensor, drives the servo and controls all four motors.
Ultrasonic distance sensor (HC-SR04 style)
Measures distance to whatever is directly ahead by timing a reflected pulse.
Servo motor
Pans the ultrasonic sensor left and right so the car can scan for the clearer direction after stopping.
Motor driver module (H-bridge)
Lets the Arduino's low-power signal pins control the higher-current drive motors.
4x DC gear motors and wheels
A 4WD drivetrain, with the left and right sides driven independently to turn.
Two-layer acrylic chassis
The structural base, with the electronics deck raised on standoffs above the motor layer.
Example Arduino sketch
A representative implementation of the control logic described above, using an ultrasonic sensor, a scanning servo and a standard H-bridge motor driver.
// ROBOVATIVE - Example Obstacle Avoiding Car Sketch
// Ultrasonic sensor (HC-SR04) + scanning servo + H-bridge motor driver
// Pin numbers below are illustrative - match them to your own wiring.

#include <Servo.h>

const int trigPin  = 9;
const int echoPin  = 10;
const int servoPin = 11;

const int leftMotorForward   = 5;   // PWM
const int leftMotorReverse   = 6;   // PWM
const int rightMotorForward  = 3;   // PWM
const int rightMotorReverse  = 4;   // PWM

const int stopDistanceCm = 20;
const int driveSpeed     = 150;  // 0-255

Servo scanServo;

void setup() {
  pinMode(trigPin, OUTPUT);
  pinMode(echoPin, INPUT);

  pinMode(leftMotorForward, OUTPUT);
  pinMode(leftMotorReverse, OUTPUT);
  pinMode(rightMotorForward, OUTPUT);
  pinMode(rightMotorReverse, OUTPUT);

  scanServo.attach(servoPin);
  scanServo.write(90);  // facing forward
}

void loop() {
  long distance = readDistanceCm();

  if (distance > stopDistanceCm) {
    drive(driveSpeed, driveSpeed);   // path clear, go forward
    return;
  }

  drive(0, 0);  // obstacle ahead, stop and look around

  int rightClearance = scanAt(30);
  int leftClearance  = scanAt(150);
  scanServo.write(90);  // return to center

  if (leftClearance > rightClearance) {
    turnLeft();
  } else {
    turnRight();
  }
}

long readDistanceCm() {
  digitalWrite(trigPin, LOW);
  delayMicroseconds(2);
  digitalWrite(trigPin, HIGH);
  delayMicroseconds(10);
  digitalWrite(trigPin, LOW);

  long duration = pulseIn(echoPin, HIGH);
  return duration * 0.034 / 2;  // speed of sound, round trip
}

int scanAt(int angle) {
  scanServo.write(angle);
  delay(300);  // let the servo settle before reading
  return readDistanceCm();
}

void turnLeft() {
  drive(0, driveSpeed);
  delay(300);
}

void turnRight() {
  drive(driveSpeed, 0);
  delay(300);
}

void drive(int leftSpeed, int rightSpeed) {
  analogWrite(leftMotorForward, leftSpeed);
  digitalWrite(leftMotorReverse, LOW);
  analogWrite(rightMotorForward, rightSpeed);
  digitalWrite(rightMotorReverse, LOW);
}